
Offer learners different ways to purchase or access your courses and learning programs by creating multiple pricing options.
A pricing option defines how learners pay for a product, such as through a one-off payment, installments, or a subscription. You can also offer free access.
Each option can have its own price, payment terms, availability conditions, and access settings.
In this guide, you'll learn how to create, configure, and manage pricing options.
Understand how multiple pricing works
You can combine different pricing types for the same product or create multiple options of the same type.
For example, the same course could have:
- A one-off payment for lifetime access
- A payment plan that splits the price into installments
- A monthly subscription
- A free option available to a specific group of learners
| Pricing type | How it works | Available for |
|---|---|---|
| One-off | Learners pay once for lifetime or fixed-duration access | Courses and learning programs |
| Payment plan | Learners split the price into scheduled installments, with an optional upfront payment | Courses and learning programs |
| Subscription | Learners pay a recurring fee at a defined billing interval | Courses and learning programs |
| Tiered subscription | Learners choose from multiple subscription tiers | Learning programs |
| Free | Learners enroll at no cost without going through checkout or receiving an invoice | Courses and learning programs |
 Payment plans and subscriptions require Stripe as the payment gateway.
Add a pricing option
You can set up your first pricing option when creating a course or learning program, and add more options later from the product's Pricing page.
Add pricing when creating a product
When creating a course or learning program:
- Create your course or leaning prrogram
- Select its access status
- Choose a pricing option and configure its price and payment settings.
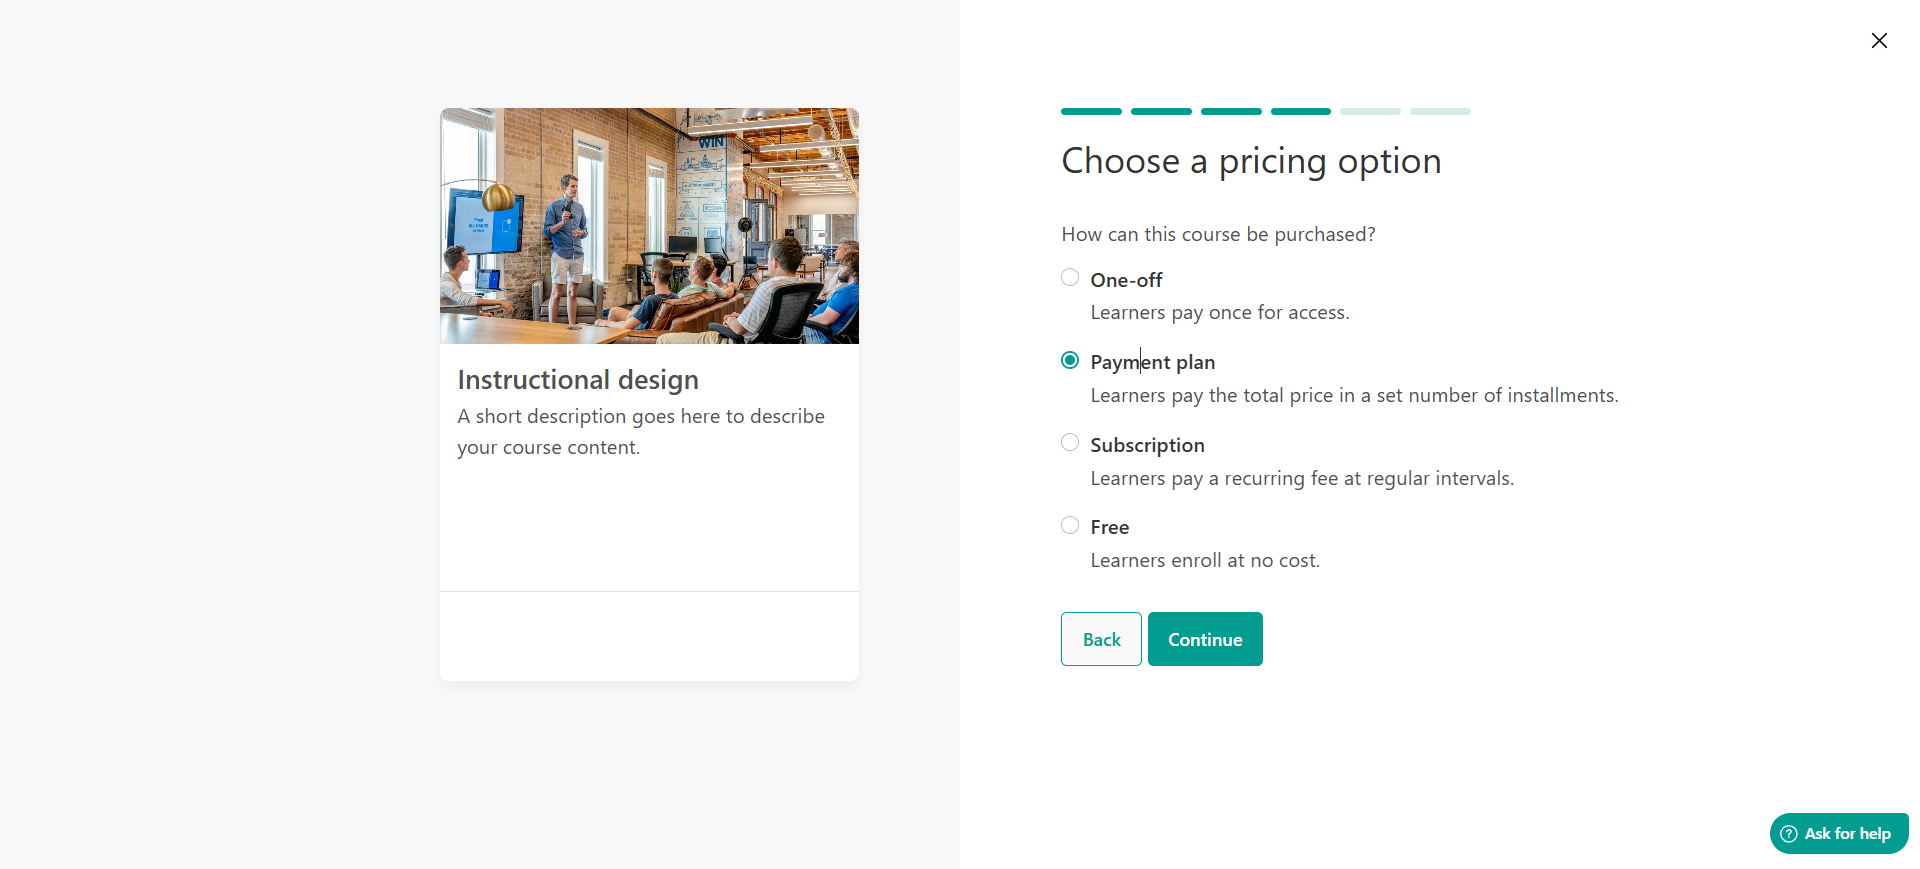
- Complete the remaining setup and select Finish
The first pricing option created during product setup is Public and automatically becomes the primary pricing option.Add pricing to an existing product
To create another pricing option:
- Open the course or learning program
- Navigate to Pricing
- Select Add pricing option
The pricing editor opens, where you can configure the option using the Setup, Availability, and Access tabs.
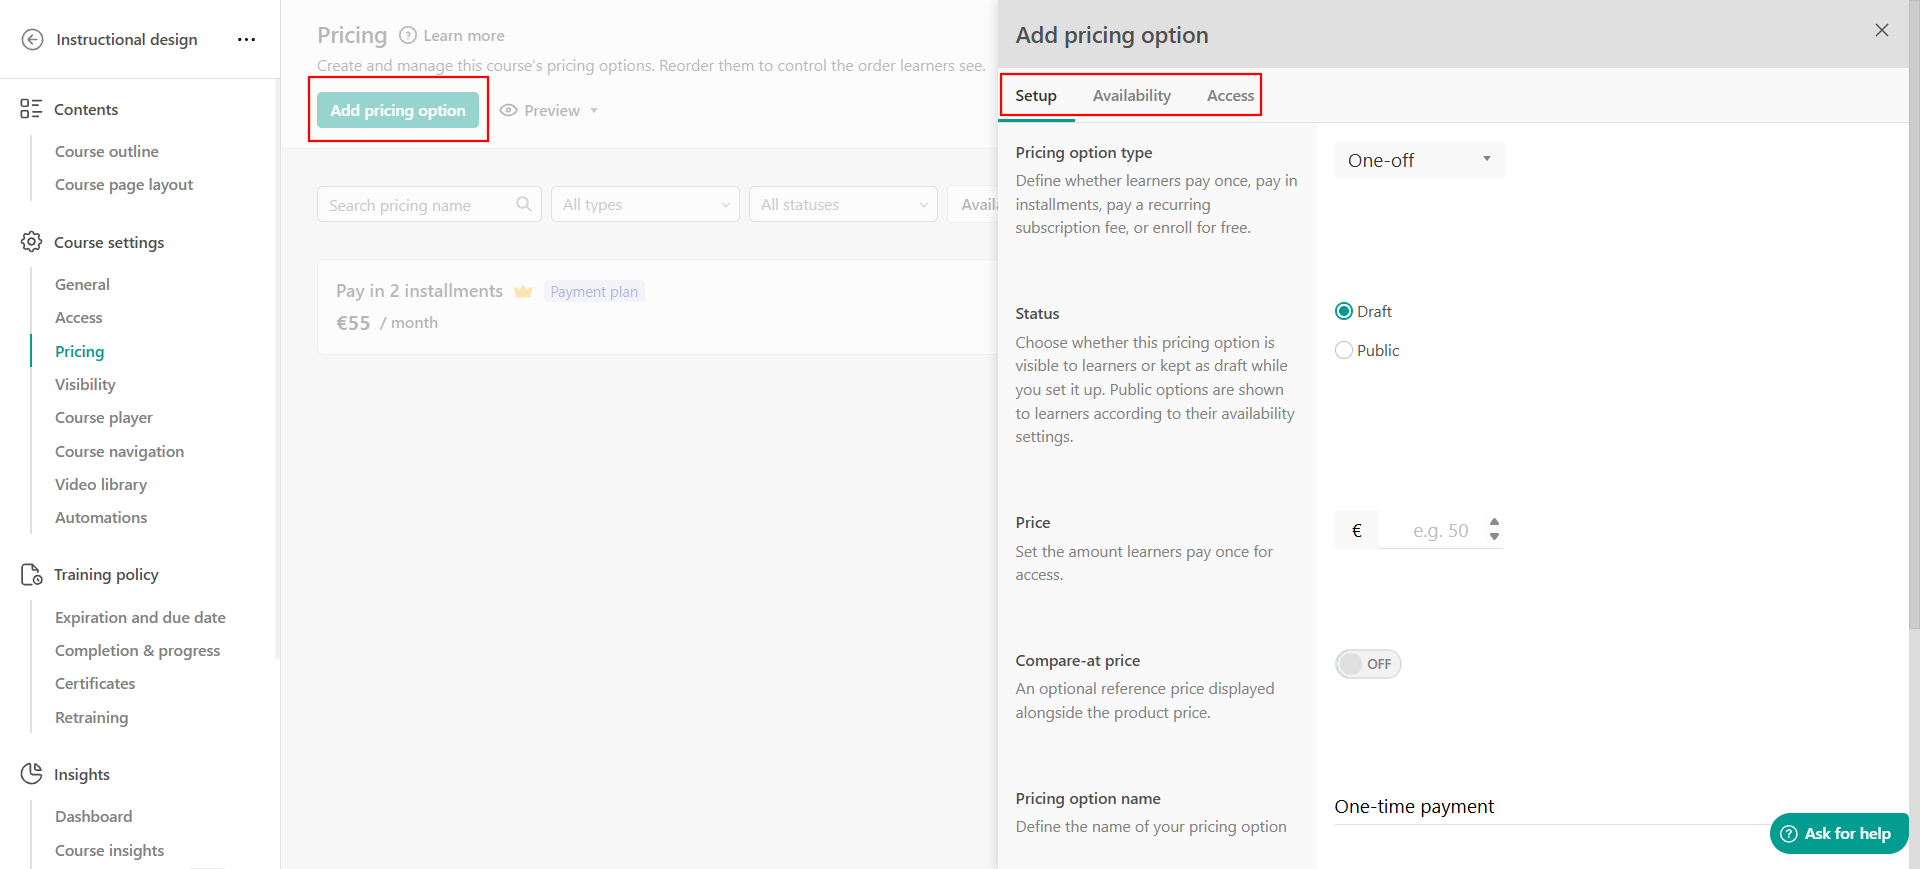
The settings available in these tabs depend on the pricing type you select.Configure a pricing option
When adding or editing a pricing option, you'll find three tabs:
- Setup: Choose how learners pay and configure the pricing details.
- Availability: Decide when the pricing option is offered and which learners can use it.
- Access: Define how long learners can access the product after enrolling.
To create a new option, select Add pricing option from the product's Pricing page. To update an existing option, open its three-dot menu and select Edit.
Setup
In the Setup tab, select the Pricing option type you want to offer.
- One-off: Learners pay once to access the product.
- Payment plan: Learners pay in installments.
- Subscription: Learners pay a recurring fee.
- Free: Learners enroll without paying.
The settings displayed depend on the pricing type you select.
For example, a One-off option requires a price, while a Payment plan lets you configure the number of installments, the amount of each payment, and the billing interval. Subscriptions have their own recurring billing settings.
Next, complete the remaining fields:
- Status: Choose Draft to keep the pricing option unavailable to learners while you configure it, or Public to make it available to eligible learners.
- Pricing option name: Enter a name that helps learners identify the option, such as One-time payment or Pay in 3 installments. LearnWorlds generates a default name if you leave this field empty.
- Description: Optionally explain what the pricing option includes. When enabled, the description appears on the product details page and in the enroll button dropdown.
Depending on the pricing type, you may also see additional settings, such as Compare-at price, Upfront payment, or installment details.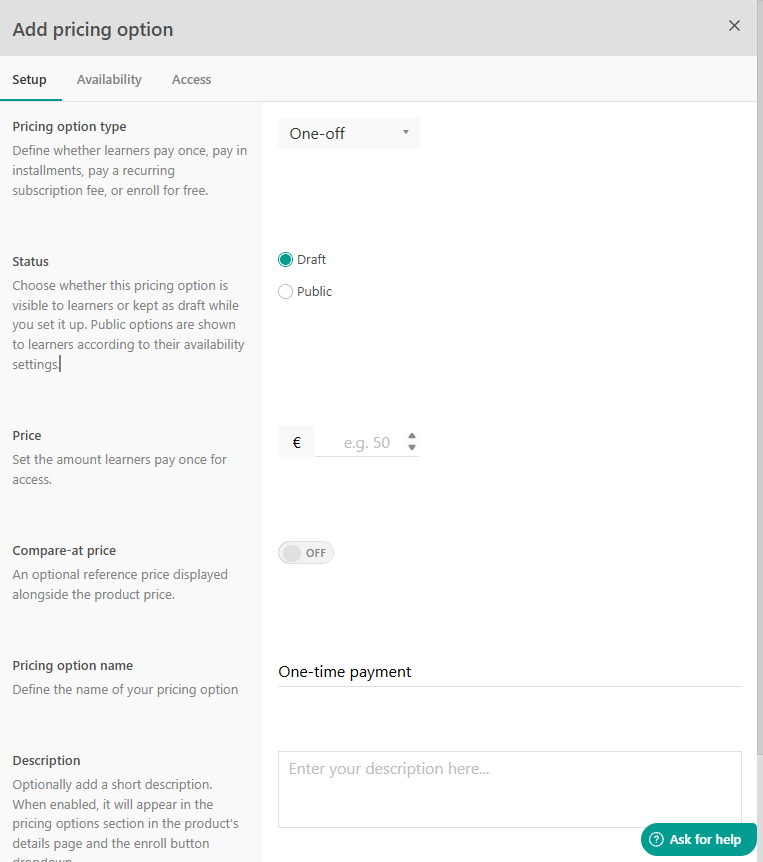
You can't change the pricing type after learners have enrolled through that option. To offer a different payment method, create another pricing option.Availability
Open the Availability tab to control when learners can choose the pricing option and who can use it.
- Availability period
Use the Start date and End date fields if you want to offer the pricing option for a limited time.
For example, you could offer a discounted price during a course launch and stop accepting new purchases at the end of the promotion.
If you don't set an availability period, the pricing option isn't restricted by these dates. When the End date passes, a Public pricing option becomes Expired. New learners can no longer purchase it, but learners who already enrolled retain their existing access and subscriptions.
- Target audience
Choose who can use the pricing option:
- Available to everyone: The option is available to all learners who meet its other availability conditions.
- Only to specific users: Restrict the option to learners who meet conditions you define, such as having a particular user tag, role, custom field value, or location.
You can combine multiple conditions using AND or OR:
- AND: Learners must meet all the combined conditions.
- OR: Learners must meet at least one of the conditions.
For example, you could offer a discounted pricing option only to learners with a specific user tag. Learners who don't meet the conditions won't see the pricing option or be able to use its checkout URL.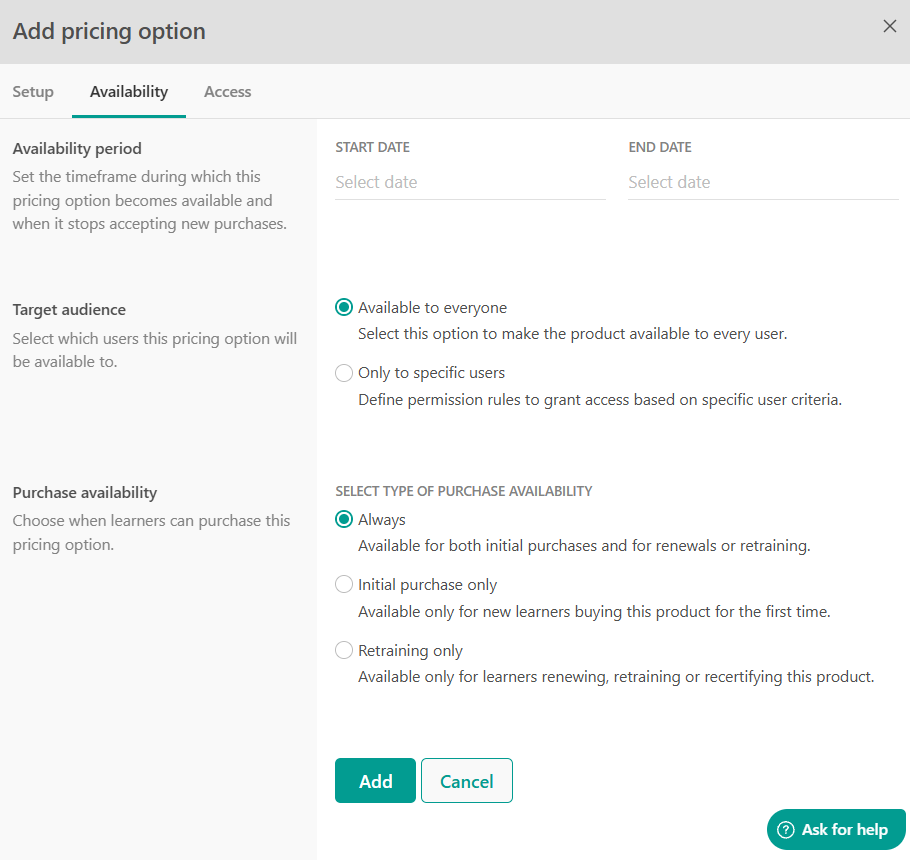
- Purchase availability
For One-off and Payment plan pricing options, you can also choose whether learners can use the option for their first purchase, retraining, or both.
| Setting | Use it for |
|---|---|
| Initial purchase only | The learner's first purchase of the product |
| Retraining only | A renewal, retraining, or recertification purchase |
| Always | Both initial purchases and retraining |
For example, you could charge €100 for the initial course purchase and €50 for retraining. To do this, create two pricing options: one with Initial purchase only and another with Retraining only.
- Always is the default for new pricing options.
- To use pricing options for course retraining, you must also configure the course's retraining settings under Training policy → Retraining.
Access
Open the Access tab to define when learners' access to the course or learning program expires after enrollment.
This setting is available for Free, One-off, and Payment plan pricing options.
Choose one of the following:
- Follow product-specific expiration: Use the expiration settings already configured for the course or learning program.
- Set pricing-specific expiration: Set a separate access expiration for learners who enroll through this particular pricing option.
If you choose Set pricing-specific expiration, you can configure access to end after a set period from enrollment or on a specific date.
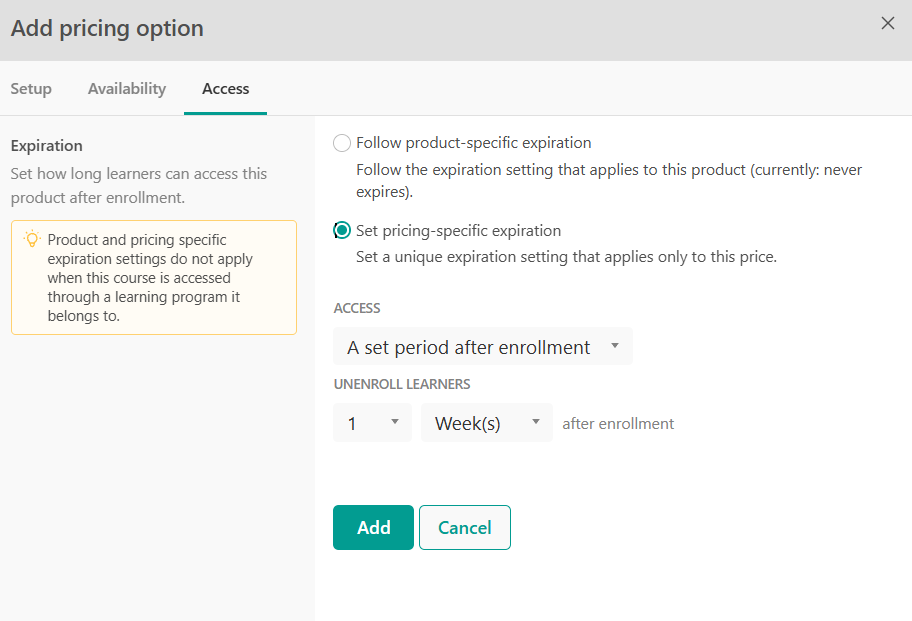
For example, you could offer two One-off pricing options for the same course:
- €50: Access for three months.
- €100: Access for one year.
This way, learners can choose a pricing option based on how long they want access.
- The Availability and Access tabs control different things.
- Availability period: Determines when new learners can purchase the pricing option.
- Access expiration: Determines how long learners can access the product after enrolling.
For example, a pricing option might be available for purchase until December 31, while learners who purchase it receive access for six months from their enrollment date.
- For courses, product-specific and pricing-specific expiration settings don't apply when learners access the course through a learning program that contains it.
Understand and change the primary pricing option
Each course or learning program has one primary pricing option, identified by a crown icon on the Pricing page. The primary option is used by default when a supported action requires a pricing option and none has been selected. It's also highlighted on supported learner-facing screens.
When you create a product, the first pricing option you set up automatically becomes the primary option. You can change it later.
- When you create a course or learning program, the first pricing option you set up is automatically assigned as the primary pricing option.
- Because the product needs a primary option, you can't delete, archive, or change the primary option to Draft. Set another eligible Public option as primary first.
Change the primary pricing option
To use another pricing option as the primary option:
- Open the course or learning program and select Pricing
- Find the Public pricing option you want to use
- Select the three-dot menu
- Select Set as primary
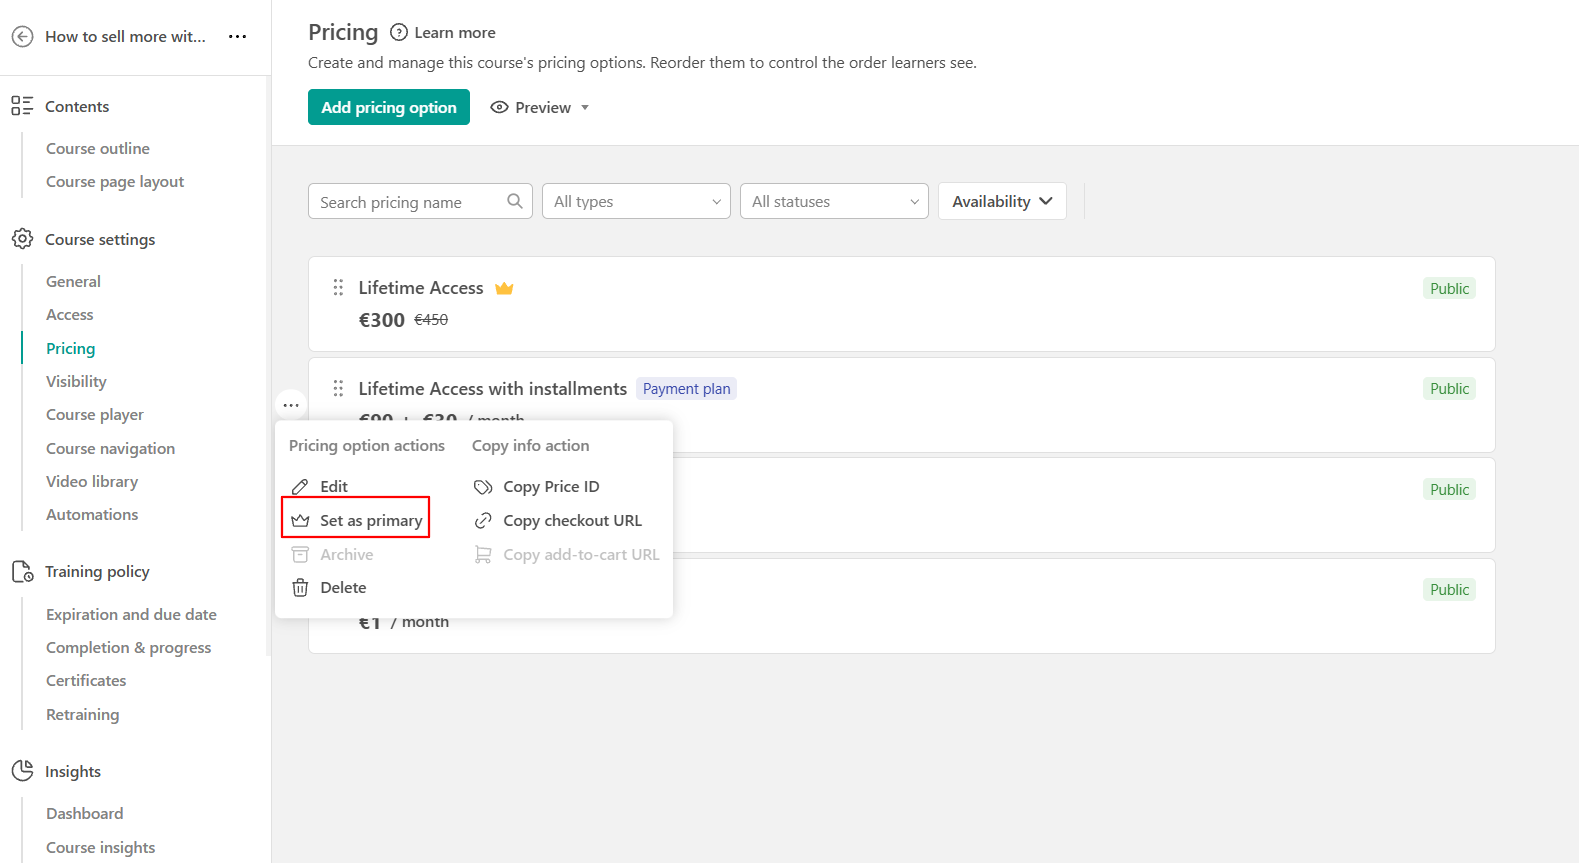
- Draft, Archived, and Expired pricing options can't be set as primary.
- Changing the primary option doesn't move existing learners to the new option. Their existing pricing option, payments, and access remain unchanged.
- Only one pricing option can be primary at a time.
How learners see and choose pricing options
When you offer multiple pricing options for a course or learning program, learners can choose the one that best suits their needs.
Only Public pricing options that meet the learner's availability conditions are displayed. These conditions may include the availability period, target audience, and whether the option is available for initial purchases or retraining.
For example, if a course offers a one-off payment, a payment plan, and a monthly subscription, eligible learners can choose their preferred option before enrolling.
Keep in mind:
- Display order: Pricing options appear in the order you've arranged them on the product's Pricing page.
- Changing pricing options at checkout: When purchasing a single product, learners can change their selected pricing option on the Payment page. This isn't available when purchasing multiple products together.
- Free pricing options: Learners can enroll directly without going through checkout, and no invoice is generated.
Review and manage your pricing options
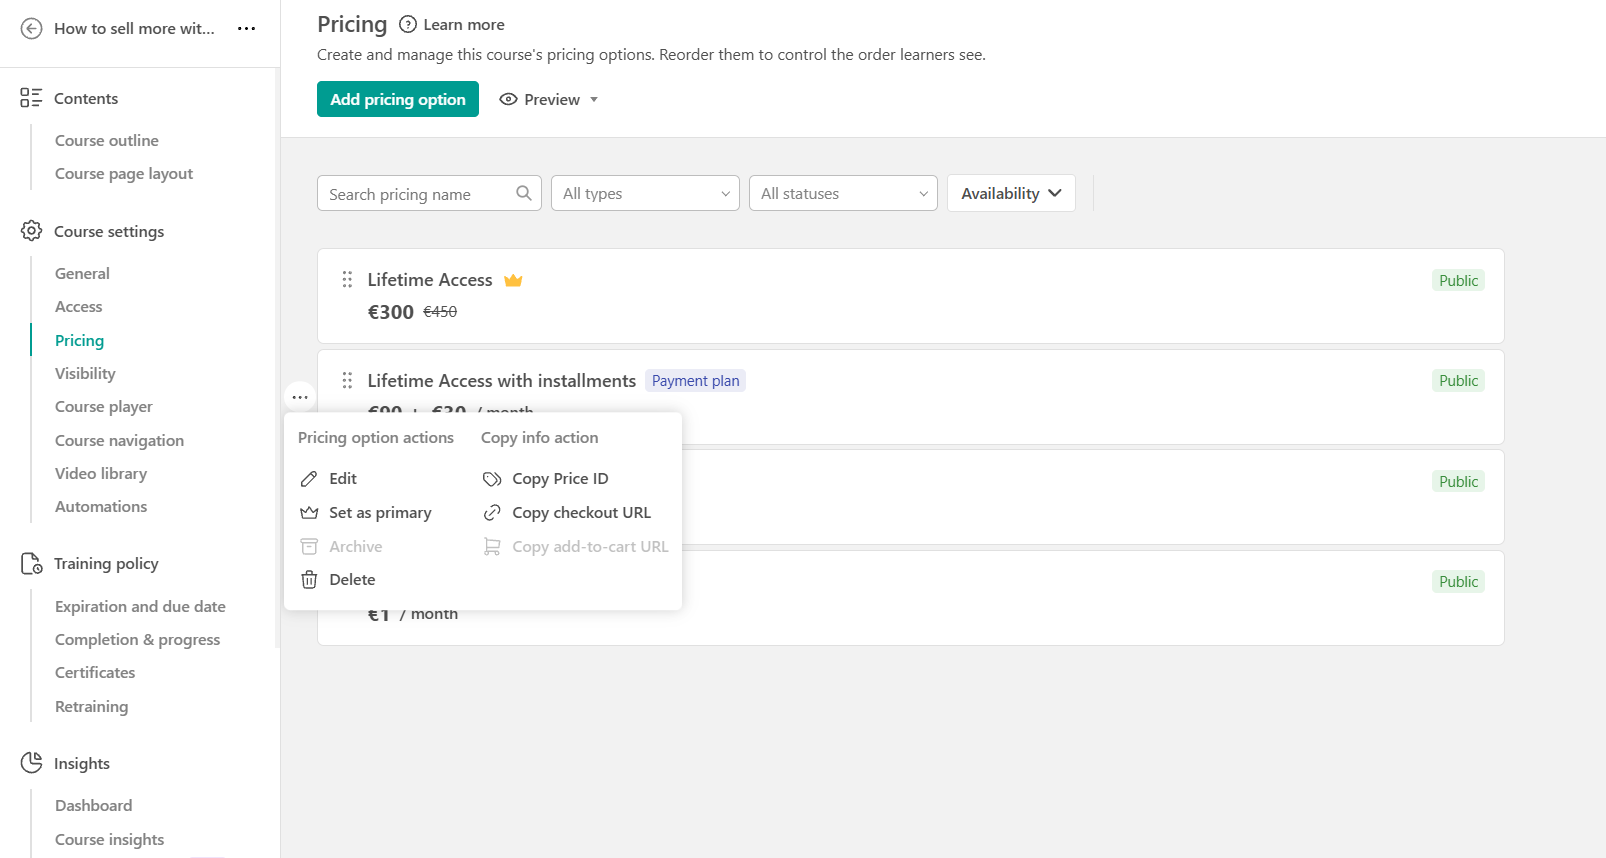
Once you've created your pricing options, you can review and manage them from the product's Pricing page.
From here, you can:
- Search and filter: Find pricing options by name, type, status, or audience.
- Reorder: Drag and drop pricing options to change the order in which they appear to learners.
- Preview: Select Preview to see how your pricing options appear to learners.
- Manage: Open the three-dot menu next to a pricing option to edit it, set it as primary, archive it, delete it, or copy its checkout URL, depending on the available actions.
Understand pricing option statuses
Each pricing option has a status that determines whether it is available for new enrollments.
| Status | What it means | What learners experience |
|---|---|---|
| Public | Available for manual or self-enrollment | Eligible learners can select the option when its availability conditions are met |
| Draft | Still being prepared and unavailable to learners | Learners can't self-enroll through the option |
| Archived | No longer offered for new enrollments | Existing learners keep their access, and recurring payments continue |
| Expired | Its configured availability period has ended | New self-enrollment is blocked, while existing access and subscriptions continue |
A Public pricing option is visible only to learners who meet its configured availability conditions, such as the availability period, target audience, and purchase availability.Edit a pricing option
You can update an existing pricing option to change its price, payment settings, availability, or access rules. To edit a pricing option:
- Go to Pricing
- Open the pricing option's actions menu
- Select Edit
- Update the available Setup, Availability, or Access settings
- Select Save
- Changing the price applies to new purchases. Learners who already purchased through the option keep their existing purchase terms.
- Changing an option's audience does not remove access from learners who already enrolled through it.
Archive or restore a pricing option
If you no longer want to offer a pricing option to new learners, you can archive it instead of deleting it.
Archiving removes the option from new enrollments while keeping existing learner access, payment arrangements, and enrollment history.
To archive a pricing option:
- Open the product's Pricing page
- Open the three-dot menu
- Select Archive
- Review the confirmation message and select Archive.
To restore an archived option, open its three-dot menu and select Unarchive.
- For tiered subscriptions, individual tiers are archived or unarchived instead of the tiered subscription itself.
- The primary pricing option can't be archived. Set another eligible option as primary first.
- Archived options are hidden from unenrolled learners. Existing learners retain their access, and recurring payments continue.
Delete a pricing option
You can permanently delete a pricing option only if it has never been used for a learner enrollment and no licenses or gifts have been purchased through it.
To delete a pricing option:
- Open the product's Pricing page
- Open the three-dot menu
- Select Delete
- Confirm that you understand the action can't be undone
- Select Delete
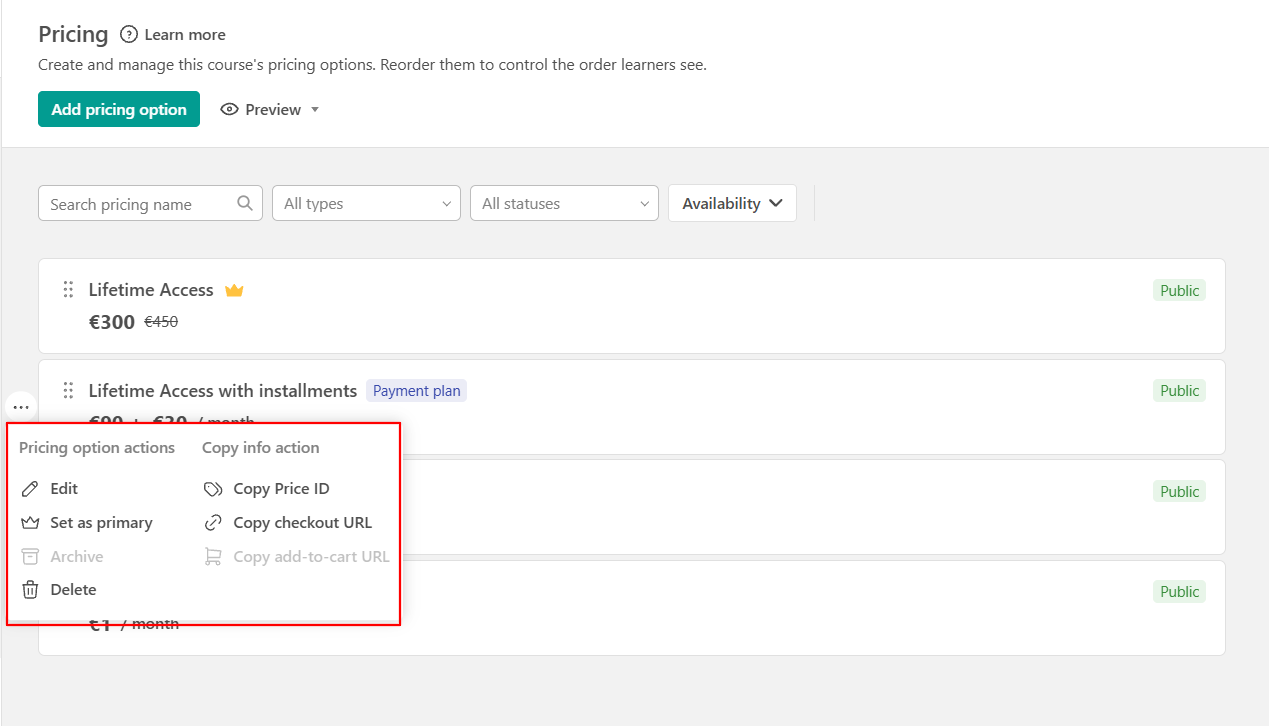
- Deleting a pricing option can't be undone.
- If a learner has ever enrolled through the option, you can't delete it, even if that learner is no longer enrolled. Αrchive it instead.
- You can't delete the primary pricing option. First, set another eligible Public pricing option as primary.
Share a specific pricing option
Each pricing option has its own checkout URL, which you can share with learners to direct them to that specific payment option.
To copy the URL:
- Navigate to the product's Pricing page.
- Find the pricing option you want to share and open its three-dot menu.
- Select Copy checkout URL.
- Share the copied link with your learners.
Sharing a checkout URL doesn't bypass the pricing option's availability settings. Learners must still meet the configured audience and other availability conditions to use the option.Important notes
- Tiered subscriptions are available for learning programs, not courses.
- If a Public product has no Public pricing options, learners can't self-enroll in it.
- School Sync and cross-academy syncing support Free and One-off pricing options only.