HubSpot integration makes it easy to sync user data to HubSpot from a large pool of LearnWorlds user properties, choose from a wide range of activity events that can take place in LearnWorlds, and enable them to fire automatically in HubSpot.
 While full HubSpot native integration is only available in the Learning Center and High Volume plans, all plans—including Starter and Pro—can integrate HubSpot using the tracking code.
In this article, you’ll learn how to connect HubSpot with your LearnWorlds school and configure the integration settings.
Activate the HubSpot integration
To connect HubSpot with your LearnWorlds school:
1. Log in to your LearnWorlds school.
2. Navigate to Settings → Integrations → CRM tools.
3. Click on the Activate option and Connect to HubSpot.
4. You will be redirected to HubSpot to authorize your LearnWorlds account and, eventually, connect it to HubSpot.
You need to select the Hubspot account you would like to connect to your LearnWorlds school and click on Choose account → Connect App.
Once connected, the HubSpot settings page in LearnWorlds shows the connected HubSpot account.
If your school uses only the HubSpot tracking code , data sent to HubSpot is limited to a small set of properties captured via the tracking code (email, username, user ID, marketing opt-in status, and first/last name if provided in a lead capture form). This is a different data path from the native integration described in this article. For setup and behavior details, see the HubSpot tracking code article.
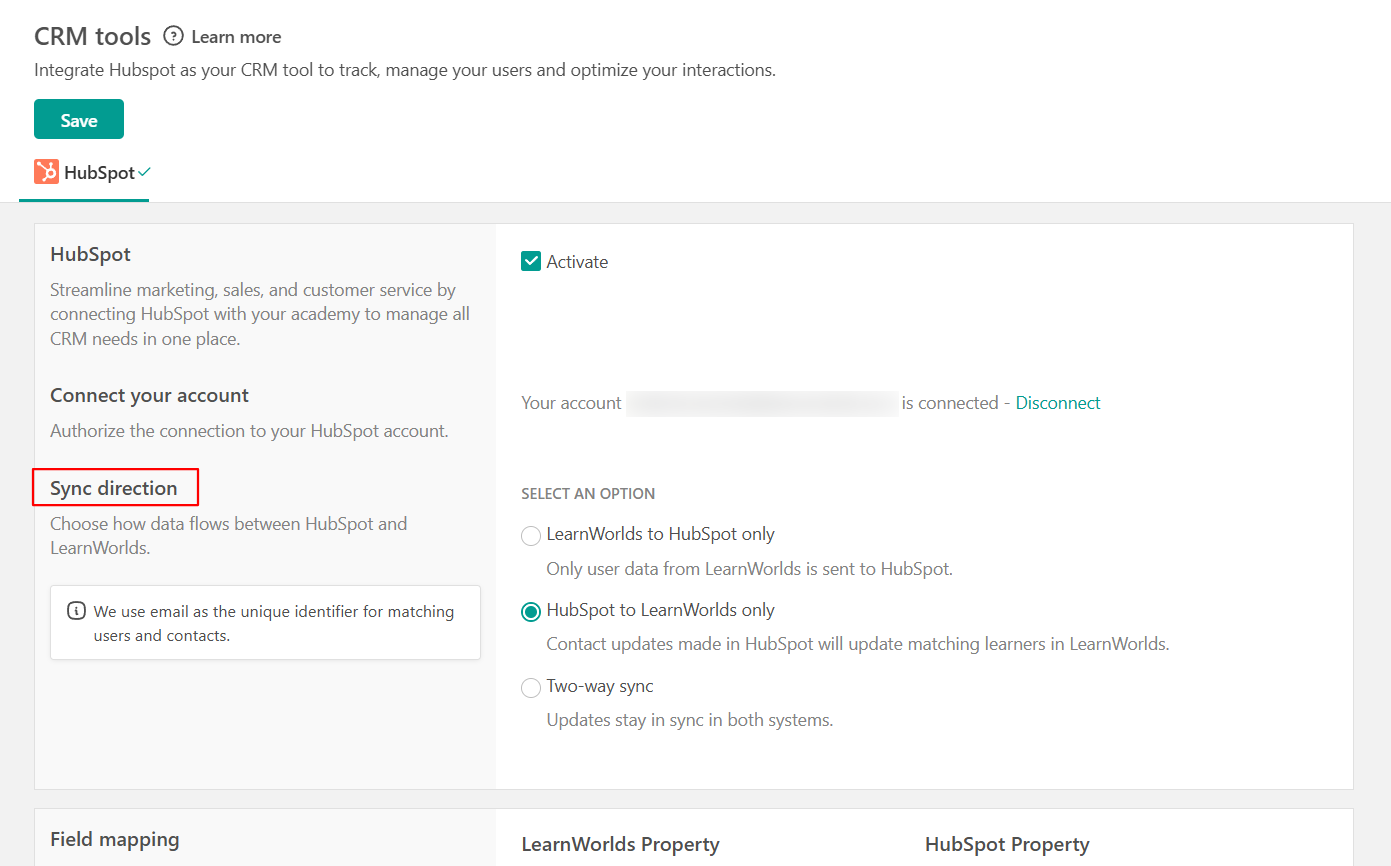
Sync directions - controlling how data flows
The HubSpot integration supports flexible sync directions so you can decide where your contact data should be managed.
You can choose one of the following options:
- LearnWorlds to HubSpot (default): Changes made in LearnWorlds are sent to HubSpot. Use this mode if LearnWorlds is your source of truth and you want your CRM to be in sync with your school.
- HubSpot to LearnWorlds only: Changes made to HubSpot contacts are sent to LearnWorlds for the fields you have mapped. Use this mode if HubSpot is your source of truth and you want your school to reflect what your sales and marketing teams maintain in Hubspot.
- Two-way sync: Changes can sync in both directions. When two-way sync is selected, each field mapping row can have its own sync direction (LearnWorlds to HubSpot, HubSpot to LearnWorlds, or Both), giving you control over which platform is the source of truth for each individual field. Use this mode if both systems are actively updated and you want each field to follow the platform that owns it.
When switching to HubSpot to LearnWorlds or two-way for the first time, existing contacts in HubSpot will not automatically align with your LearnWorlds learners until you run a manual sync (see Manual sync below). Real-time updates will start from the moment the mode is enabled.Field mapping
Field mapping lets you choose which information from LearnWorlds should be sent to which field in HubSpot. Each mapping connects a LearnWorlds field, like a learner’s first name, country, or a custom field you created, to a HubSpot contact property.
Only the fields you map will sync between LearnWorlds and HubSpot. Any fields you don’t map will be ignored. You can add, change, or remove mappings at any time, and updates apply to future syncs immediately. Email is always used to match learners in LearnWorlds with contacts in HubSpot, so make sure the email address exists and is the same in both platforms.Add a mapping
To configure field mapping:
- Click Add field mapping
- Select a LearnWorlds field in the first column
- Select the matching HubSpot contact property in the second column.
If two-way sync is enabled, select the sync direction for that field. - Save your changes.
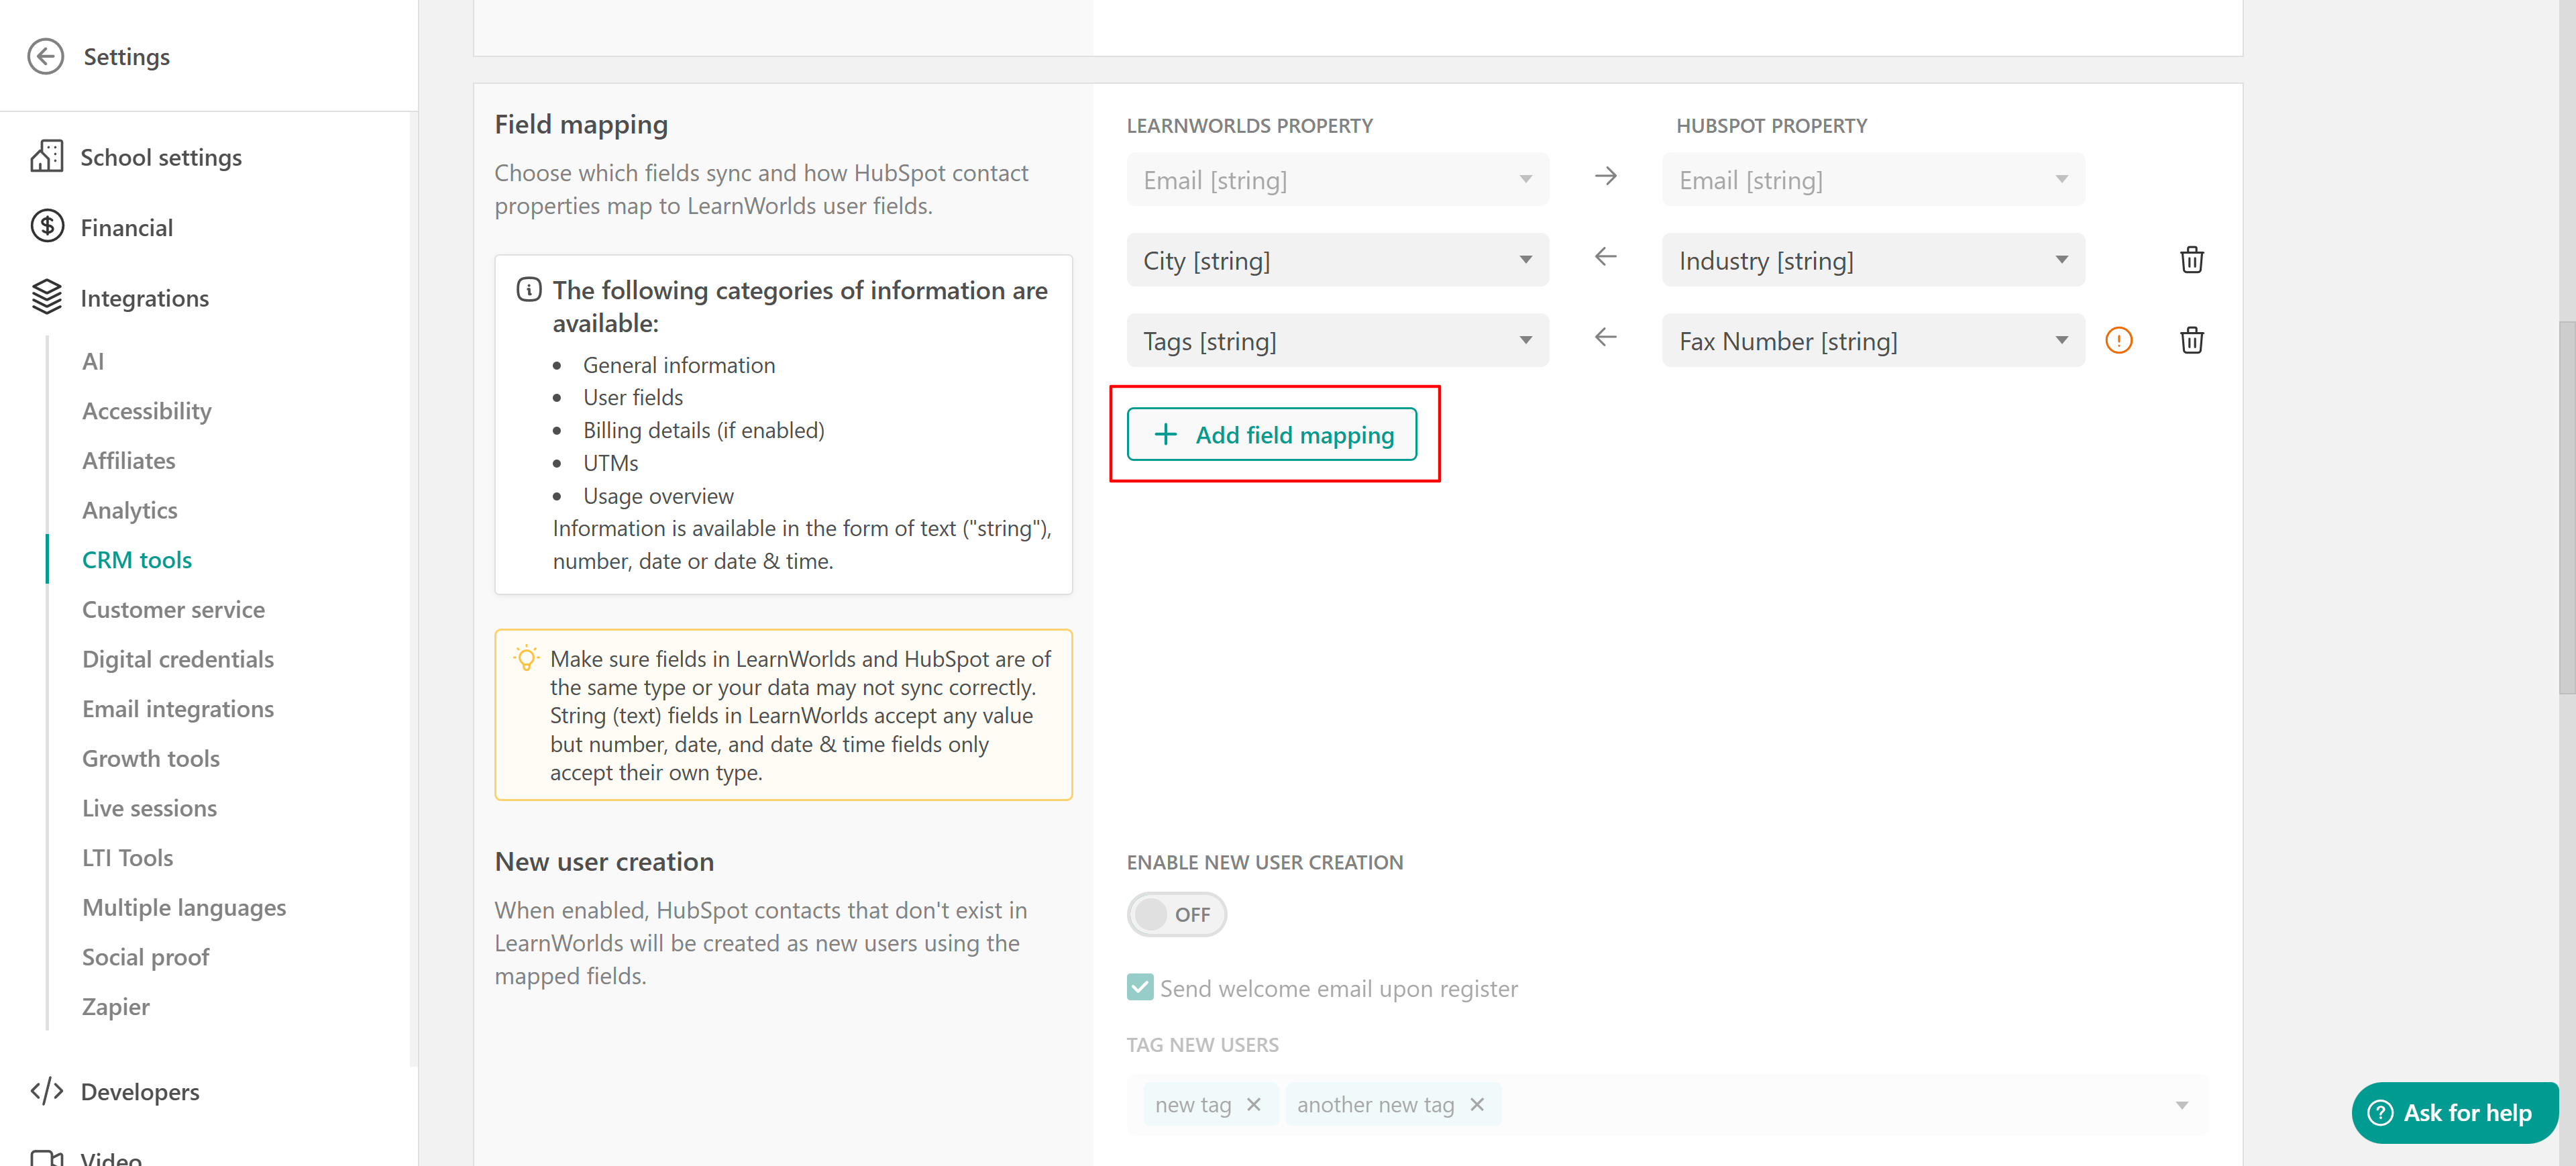
Each mapping row contains:
- A LearnWorlds property (e.g., first_name, email, a custom field)
- A HubSpot property (e.g., firstname, email, a school-created custom property)
- A sync direction
You can add, edit, or remove mappings at any time.
The following categories of LearnWorlds data are available for mapping:
- General information (name, email, etc.)
- User fields (phone, address, country, company, website)
- Custom fields (prefixed cf_)
- Billing details (if billing info is enabled in school settings)
- UTM parameters
- Usage overview fields (e.g., last purchase date)
HubSpot supports four field types that LearnWorlds will sync
- String
- Number
- Date
- Datetime
- Make sure the LearnWorlds field and HubSpot property types are compatible. If the types do not match, the mapping may be marked as invalid and skipped during sync.
- Only mapped fields are included in sync operations. Unmapped fields are ignored.
- If a mapping row is invalid, because of a type mismatch or because a property has been deleted on either side, a warning appears in the mapping interface.
- A warning appears when one or more mapping rows are invalid. Invalid rows do not sync until the issue is fixed.
- The Signup fields and Billing details LearnWorlds properties will also contain any Custom user fields that you create.
- You need consistency between LearnWorlds and Hubspot property types. When you use a [string] property type in LearnWorlds' property field, you should select a [string] one to map in Hubspot as well.
What syncs from LearnWorlds to HubSpot
When the sync direction is LearnWorlds to HubSpot or two-way, the integration keeps your HubSpot contacts up to date with your LearnWorlds learners automatically. Whenever a learner is updated, eg. a user field is updated, a billing detail, a UTM parameter, or anything else you have included in your field mappings, the same change is sent over to HubSpot within a few minutes.
- The integration uses email to find the matching person in HubSpot. If a contact with that email already exists, that contact is updated; if not, a brand new HubSpot contact is created.
- Only the fields you have set up in your mapping (see Field mapping above) are synchronized to HubSpot. If you add a new mapping later, that new field will start filling in for each learner the next time their data changes.
- To apply a new mapping to everyone at once, including learners whose data has not changed recently, run a manual sync (see Manual sync below).
Lifecycle stage
The HubSpot Lifecycle Stage property helps you track contacts based on their position in the customer journey, such as Subscribers, Leads, Marketing Qualified Leads, Sales Qualified Leads, Opportunity, and Customers, based on their engagement with your business.
By enabling this setting, you allow the Lifecycle Stage to automatically update from 'Lead' to 'Customer' when a user makes a purchase in your school. Find more information here.

LearnWorlds only supports Leads and Customers; if you wish to use one of the other stages, you need to update them manually on your HubSpot account. This means that:
1. When the Update Lifecycle Stage checkbox is disabled, and a user registers in your school (without purchasing) or registers and enrolls in a course, at the same time, by default, the contact will be synced as Lead.
2. When the Update Lifecycle Stage checkbox is enabled, there are two scenarios,
2a. If a user only registers in your school without purchasing, then, by default, the contact will be synced as a Lead. If this user enrolls in a course, the stage will switch from Lead to Customer.
2b. If a user registers and purchases at the same time, then, by default, the contact will be synced as Customer.
Timeline events
LearnWorlds can send user activity to HubSpot as timeline events. These events are informational and do not affect synced contact data, they appear in the Activity feed on the HubSpot contact record.
Some events are designed to fire only once per learner:
- When the user signs up
- When the user is deleted
- When the user makes a first purchase
All other events (tag added, enrolled in course, course completed, etc.) are repeatable and can fire multiple times for the same learner with different payloads, for example, "enrolled in Course A" and later "enrolled in Course B" are separate events.
- All timeline events are enabled by default. Admins can toggle individual events on or off under HubSpot Timeline Events
- Disabling an event stops future timeline entries of that type from being sent to HubSpot.
What syncs from HubSpot to LearnWorlds
Updating existing learners
When inbound or two-way sync is on, changes made to a HubSpot contact (by an admin, a workflow, a form, or another connected tool) flow back to the matching LearnWorlds learner in a few minutes.
- Matching is always done by email, the same address must exist on both sides for the update to land on the right learner.
- Only the fields you have mapped come through, with the sync direction you set for that field; anything unmapped or set to LearnWorlds-only is ignored.
Updates from HubSpot do not change a learner's password, role, or course enrollments, they only refresh the mapped profile fields. If a HubSpot change does not appear in LearnWorlds, the most common reasons are:
- HubSpot to LearnWorlds setting is not enabled,
- The field is not mapped (or is mapped from LearnWorlds to HubSpot) or,
- The emails do not match; a manual HubSpot to LearnWorlds sync (see Manual sync below) is the recommended way to force a refresh.
Creating new learners
By default, inbound sync only updates learners that already exist in LearnWorlds. If a HubSpot contact does not match an existing LearnWorlds user by email, no new user is created. To allow HubSpot contacts to create new learners, turn on Enable new learner creation.
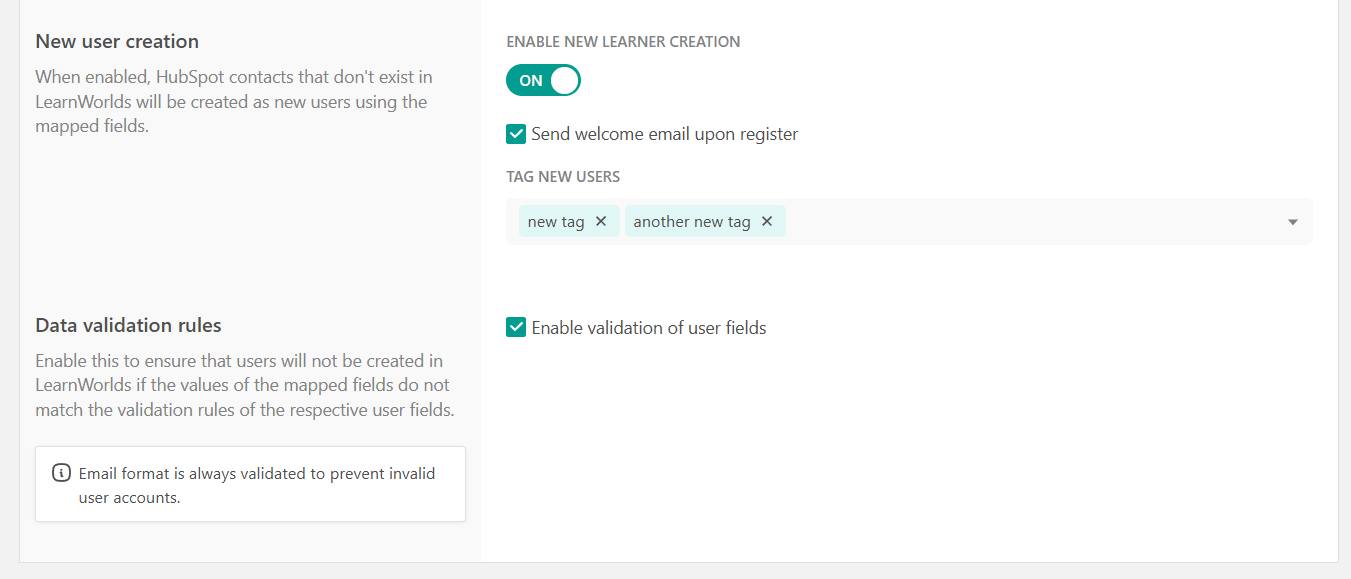
When enabled:
- New LearnWorlds users are automatically created from HubSpot contacts.
- You can choose to send a welcome email to newly created users.
- You can automatically apply LearnWorlds tags to newly created users.
Email is always required and validated for correct format so a HubSpot contact with no email address or a malformed email is skipped.Data validation rules
Enable data validation to ensure that mapped HubSpot values follow the validation rules of the corresponding LearnWorlds user fields. This helps prevent user accounts from being created with invalid data. Email format is always validated automatically, regardless of this setting.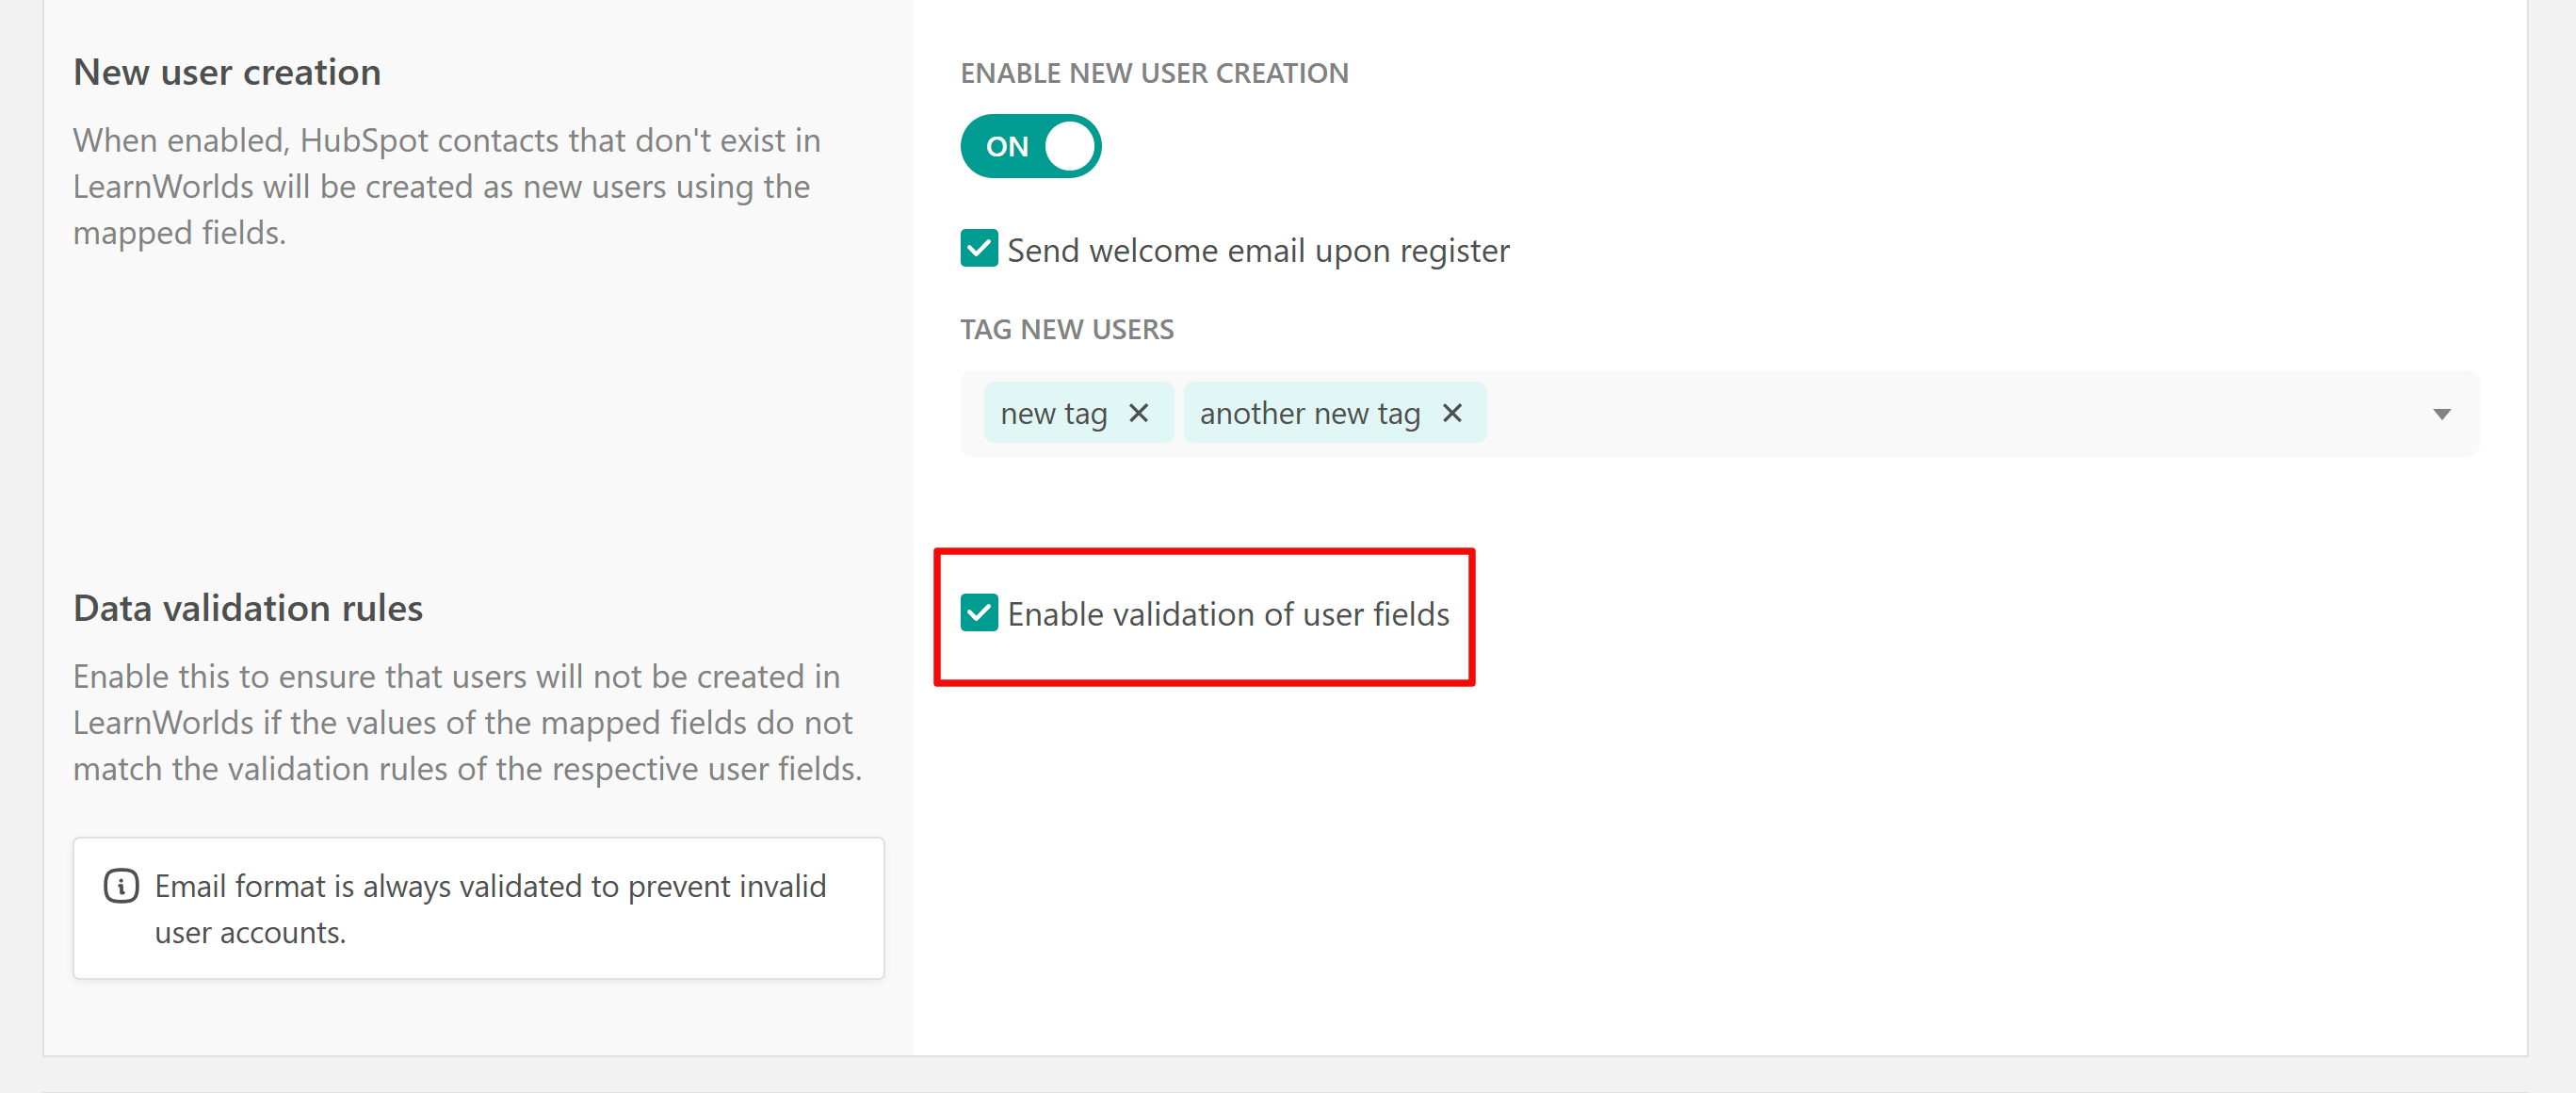
How two-way sync works in practice
Two-way sync keeps data updated between LearnWorlds and HubSpot in both directions. However, the sync direction is still defined separately for each field mapping. This means that every mapped field can be set to sync from LearnWorlds to HubSpot, from HubSpot to LearnWorlds, or both ways.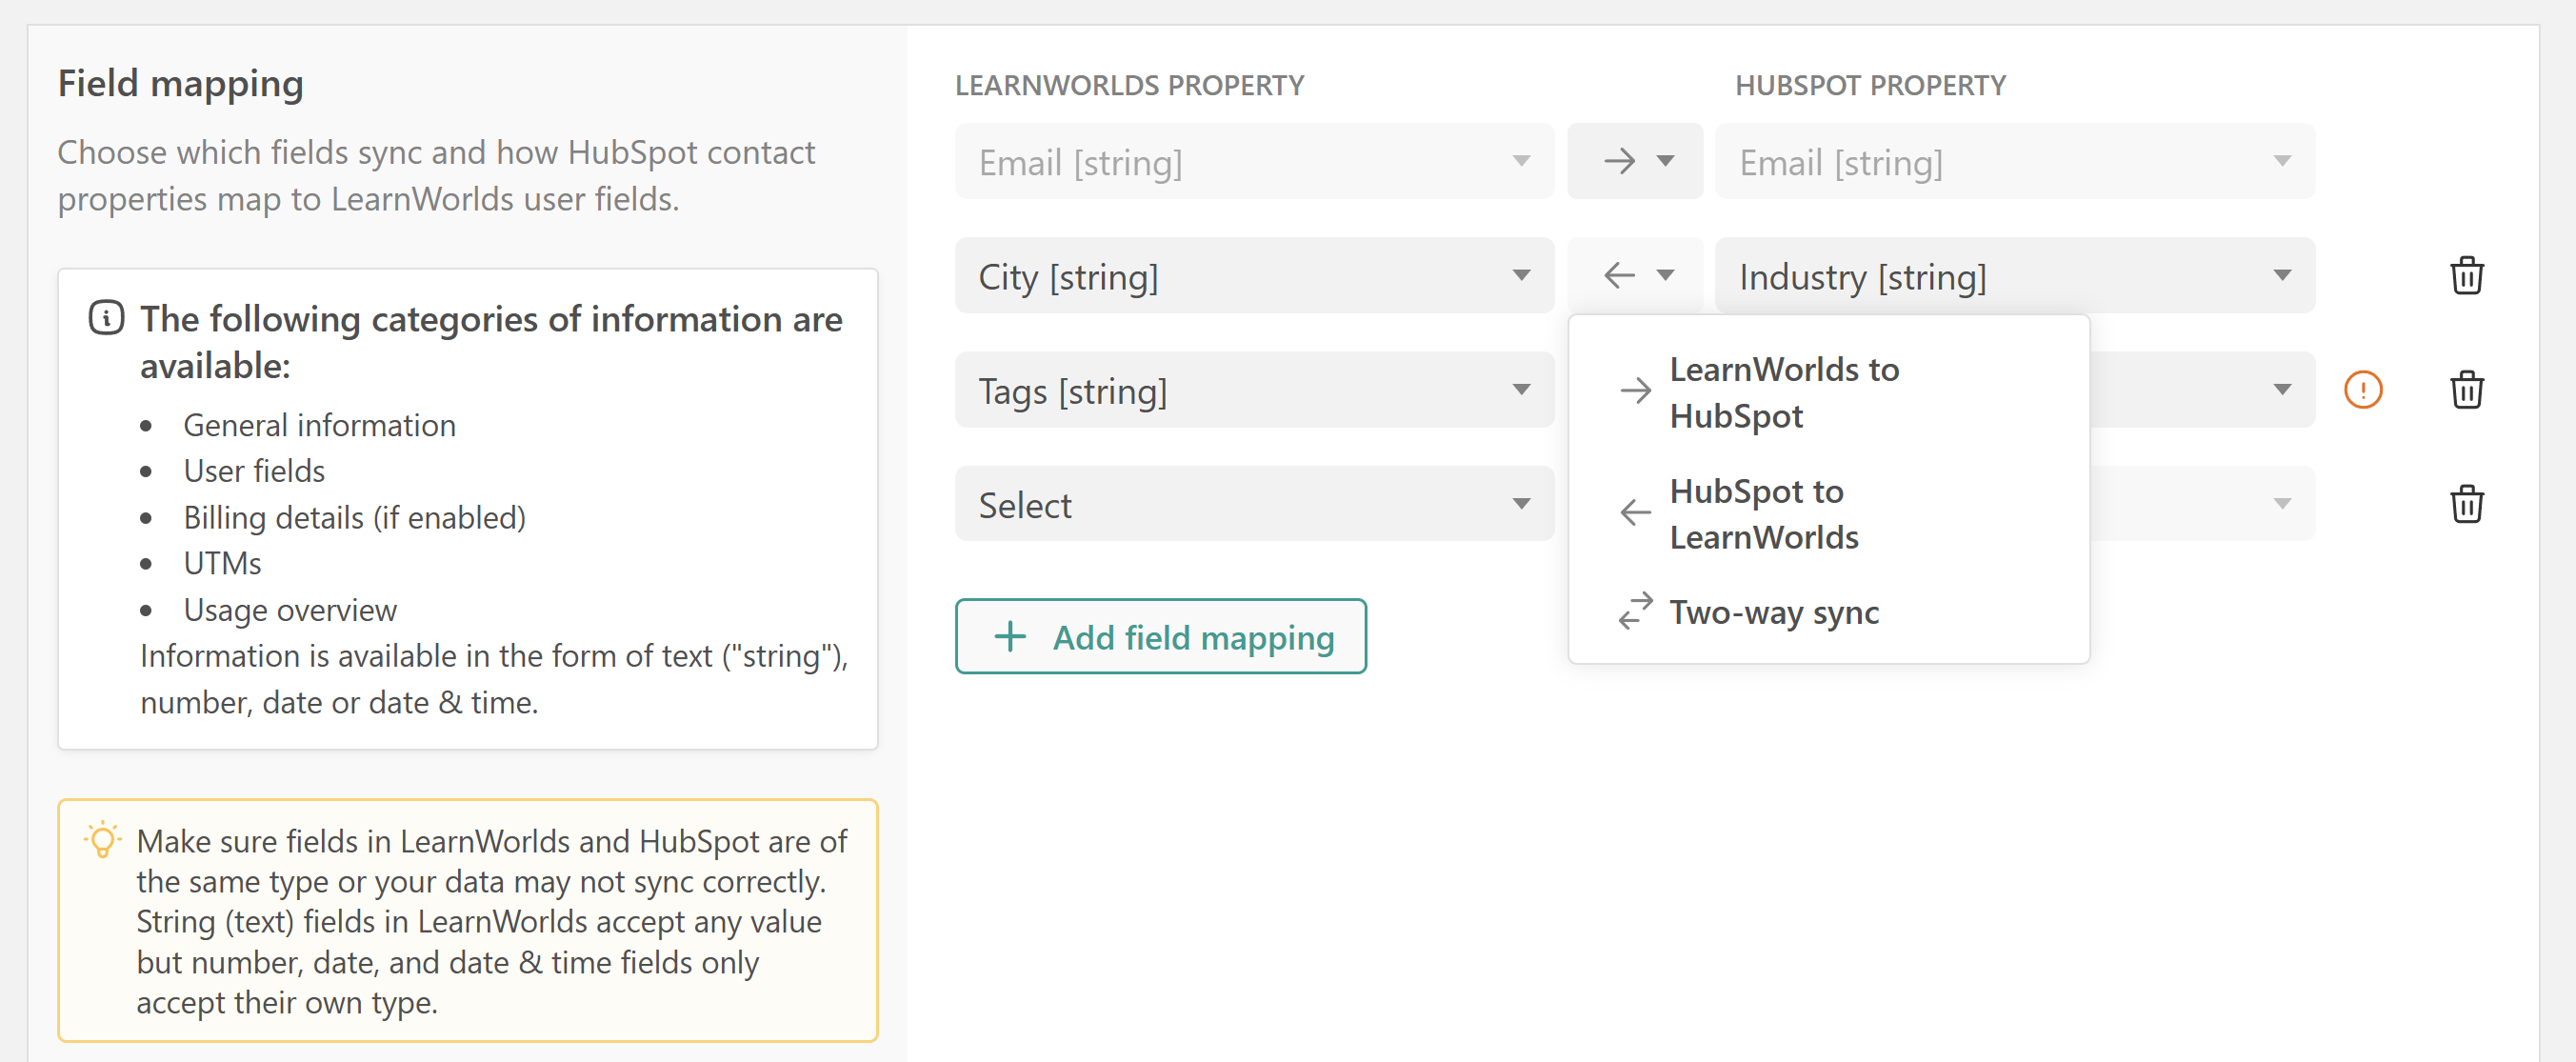
Learners and contacts are matched using their email address. If the email is different in one platform, the integration will treat them as separate people.
When two-way sync is enabled, LearnWorlds listens for updates made to HubSpot contacts, including changes made manually by admins or automatically through HubSpot workflows, and applies those updates to the corresponding learner profile in LearnWorlds within minutes, for the fields you have mapped.
Two-way sync does not automatically update older records that existed before the integration was enabled. After turning it on for the first time, run a manual sync (see Manual sync below) to align existing learners and contacts before relying on real-time updates.
Manual sync
Run a manual sync to synchronize data between LearnWorlds and HubSpot at once, following your sync direction and field mappings. Large datasets may take some time to process but the sync proceeds in the background.
The most common reasons to run a manual sync:
- First-time setup: After connecting the integration and setting up the mapping and sync direction, run a manual sync to align existing contacts and learners before relying on real-time updates.
- New field mappings: If you add a new property mapping and want to backfill historical data for existing users, a manual sync is required. Going forward, the data will sync automatically with each new update, according to your mappings and sync direction.
- Data recovery: If real-time sync was interrupted or disabled for a period, a manual sync can bring both sides back into alignment.

A "Sync in progress" indicator appears in the settings UI while a sync is running.
Disconnect Hubspot from Learnworlds
If you want to disconnect your HubSpot account from your school, navigate to Settings → Integration → CRM Tools and click the Disconnect button. Click Save to confirm the changes.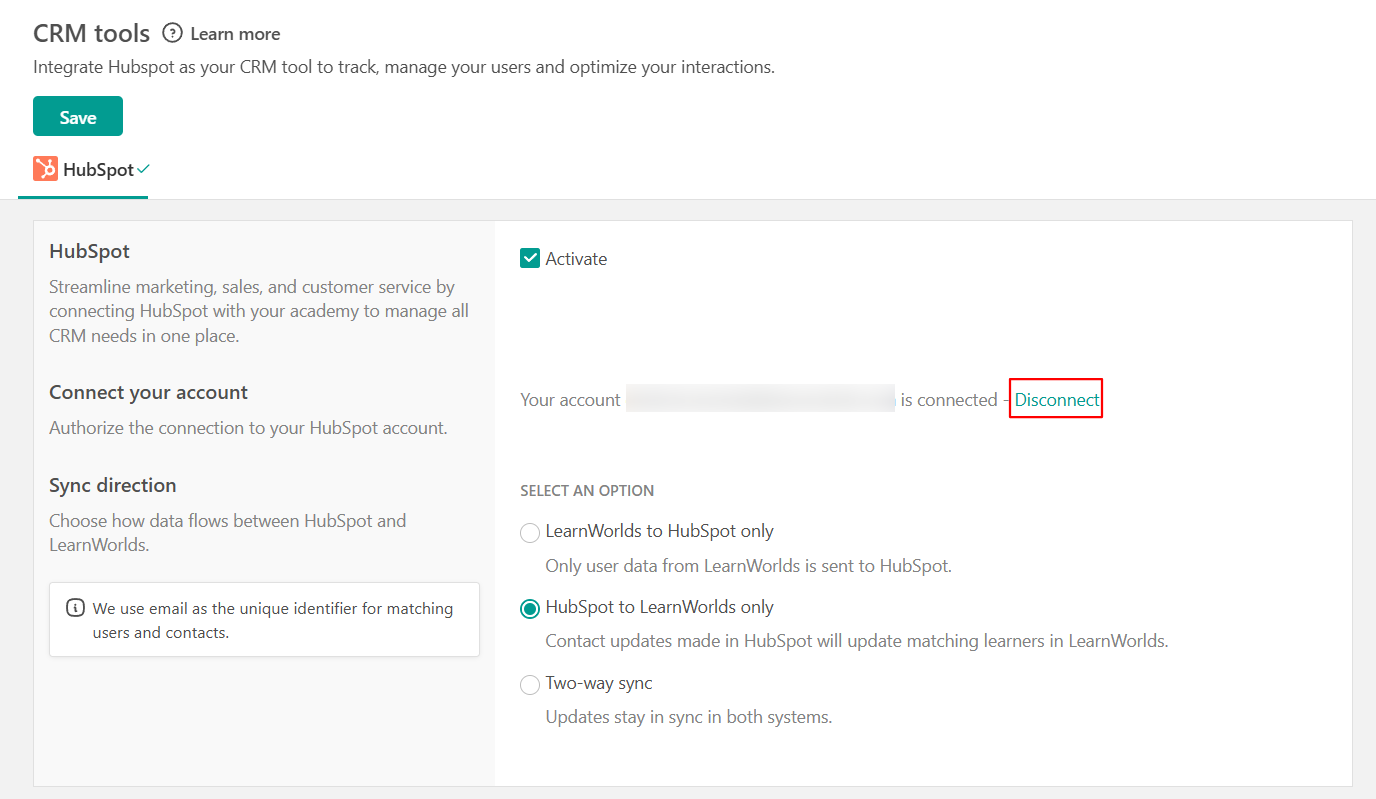
Disconnecting LearnWorlds from HubSpot
Navigate to your Hubspot account, click Settings → Connected Apps, and locate LearnWorlds. Click Actions → Uninstall and follow the next steps needed.
- Disconnecting LearnWorlds from HubSpot does not automatically remove the connection from your HubSpot account. To fully disconnect, you must also log in to your HubSpot account and remove the integration there.
- If the connection between HubSpot and LearnWorlds is lost for any reason, the integration will be automatically deactivated. You will be notified via email at the address specified under School Emails.

- If you have enabled the GDPR toolkit, your users will need to accept the targeting/ marketing cookies for them to be added to your HubSpot contacts upon Sign-Up.
- When modifying an existing user's account—such as updating their username—the affected user must log in at least once after the change. This step is necessary for the updated information to sync with your HubSpot contacts.
- If you're using HubSpot Properties that sync data from multiple platforms, it's strongly advised to create distinct properties for mapping LearnWorlds data. This separation helps prevent data from other platforms from overwriting information sourced through LearnWorlds.