LearnWorlds is making it possible to have your very own white-labeled branded Social Logins for Facebook, Linkedin, Twitter, Google, and Apple. This means that you can completely remove any mention of the LearnWorlds brand (e.g., LearnWorlds logo) on the Social Logins.
In this article, you will find a step-by-step guide to Whitelabel your school's Facebook Social Login.
Facebook Developer Account settings
In order to white label the Facebook social login of your LearnWorlds school, you need to create & set up your Facebook Developer Account, and follow these steps:
1. Create a Facebook Developer Account. You will find all the steps on how to Register as a Facebook Developer in Facebook's guide here.
2. After you register as a Facebook Developer, you can Create an App while logged into your Facebook developer account;
can select the Authenticate and request data from users with Facebook Login.

Next, choose the No, I'm not building a game option,
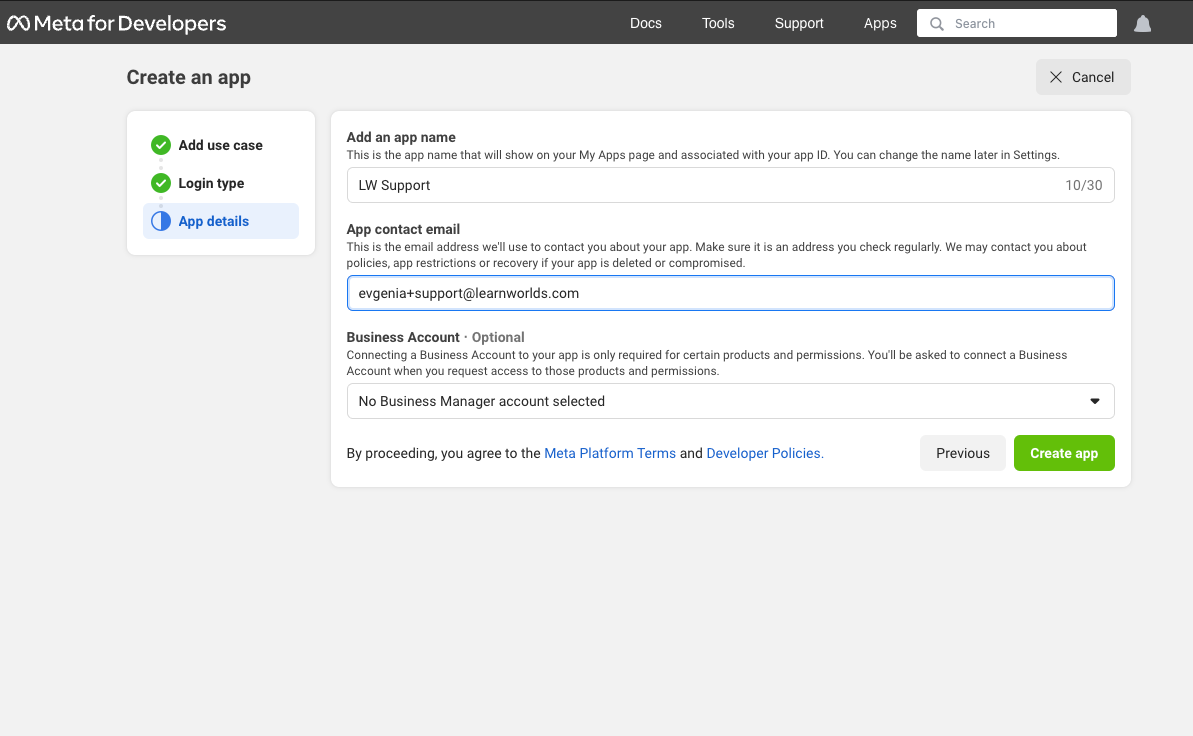
Add your app details, app name, and contact email, no need to choose a Business Manager account, and last, click on the Create app button.
3. Once you have completed the app creation flow, you will be redirected to the App Dashboard. Click to Customise adding a Facebook Login button.
4. Click on the Go to settings button.
and in the Valid OAuth Redirect URIs add your LearnWorlds school's URL including the /f/signin/facebook (for example https://yourschoolname.com/f/signin/facebook), and click on Save Changes.
5. Navigate back to Permissions and click on the add button on the email field.
6. Go back and navigate to App Settings → Basic.
There you need to Fill in:
- In the Privacy Policy URL field add your LearnWorlds privacy page (https://yourschoolname.com/privacy)
- In the Terms of Service URL field add your LearnWorlds terms page (https://yourschoolname.com/terms)
- In the User data deletion field add (https://yourschoolname.com/terms)

7. Copy your App ID and App Secret. The App ID and App Secret will be pasted to the respective fields in your LearnWorlds school, after your app is reviewed and has received approval (see below)
8. Click on Publish at the left-side menu. To publish your app, you will need to Verify your Business account and answer the Data handling questions (see below). Once these are reviewed and customized accordingly, click on Publish to publish your app.

Business verification
Completion of this process is limited to individuals who have complete control over a Business Account. For more details on business verification, please consult this article. Click on Start Verification to start the process.
Data handling questions
After successfully adding a verified business account, return to the Publish section to address data handling questions. Click on Go to data handling questions.
Select Answer questions about data handling, and under the Usage Check tab, review and confirm the data usage permissions and features you have added. Use the checkboxes to agree and click on Confirm.
Within the Data Handling tab, provide details about your data handling practices to gain access to permissions. This step is mandatory for App review and launch. Answer the questions provided and click on Submit.
Finalize the Whitelabeling Configuration in LearnWorlds
1. Navigate to your LearnWorlds school and click on Website → Website setting → Authentication → Social.
2. Add the App ID (Key) and Secret under Whitelabel Social Logins and click on Save.


To utilize the white-labeled Facebook login, the Facebook developer app must undergo a review process and receive approval.